How to Check Continuity on a Thermal Fuse
The electrical devices sometimes stop working unexpectedly. The reasons could be innumerable. Before you provide the device to a technician for repair, you must check the thermal fuse. Sometimes, it's just the fuse that you need to change. It can save your bucks and time. You can easily check it with a multimeter. However, how to test a thermal fuse without a multimeter?
There could multiple instances in an appliance's life cycle when you need to change the fuse. There is a long list of ways to test a thermal fuse without a digital multimeter. For instance, you can use an ohmmeter. You can even test it without any testing devices and we will let you know how to do that.
What is a Thermal Fuse and why it is used?

First, let us make you familiar that what a thermal fuse is.
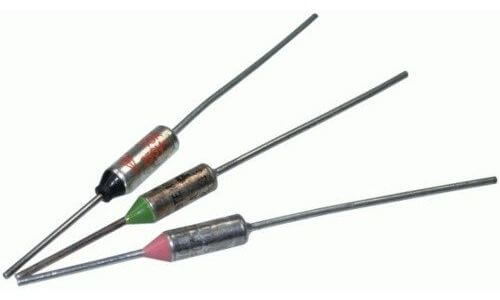
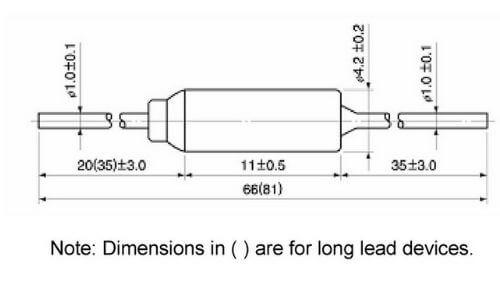
A thermal fuse is a type of thermal cutoff, which breaks the circuit when it experiences overheating. It acts as a safety device in almost all electrical gadgets. Whenever the temperature increases above a certain level, it melts down. As the circuit becomes open, the heat doesn't reach other parts of a device, saving them from harm.
The thermal fuse is a tiny element yet plays a significant role in appliances' safety and averting fires. It is not possible to reset or reuse it. Hence, you need to change it after it becomes unusable to make the appliance function again.
Generally, a digital multimeter is used to test the working condition of the fuse. However, if you don't have a multimeter, you can use the methods mentioned below.
You can check Electrician Tool List from hare
How to Test a Thermal Fuse Using Ohmmeter?

What's an ohmmeter? An ohmmeter is a device that calculates the electrical resistance of any material.
So, how are we going to use an ohmmeter to check if the thermal fuse is blown?

Cutting Supply and Finding the Thermal Fuse
The first step is to stop the device's power supply. Now, you need to find out the thermal fuse. Its placement in an appliance is something that varies with the type of device, brand, and model. In most cases, you won't need to make much effort to find it.
Opening the Appliance and Removing the Thermal Fuse
You would need a screwdriver to open the electrical instrument. Most of the thermal fuses appear as white plastic strips. They are connected with wires on both ends, allowing them to be a part of the circuit. Remove the thermal fuse in place by detaching it.
Setting the Ohmmeter Scale
Now, you need to set the ohmmeter to the Rx1 scale (RX setting). It is the perfect scale as it shows direct reading. If the reading displays 1, that means the resistance is 1 ohm. If it reading to infinity that means the resistance is very high that the current can't pass. If you have an analog ohmmeter, then also you can calculate the resistance in the fuse. However, digital ohmmeters are more accurate.
Using the Ohmmeter
Check the value on the ohmmeter before you touch the probes to both ends of the fuse. It must be zero. Polarity doesn't play any role in this case. You can touch either of the probes to either of the ends.
Analyzing the Results
At the time when you touch the probes, the ohmmeter will show some value. It must be less than 20 ohms. On analog ones, you can check the pointer. If the reading is high- 200 ohms or even more, that suggests that the fuse is bad. Sometimes, it shows reading to infinity.
How to Test a Thermal Fuse without Continuity Testers?

If you don't have continuity testers, you still have a way to check if the thermal fuse is blown. However, it would require a bit of effort.
As in any case, you first need to find out the position of the thermal fuse. After finding it out, you simply need to remove it by disconnecting both its ends from the circuit.
Now, you need to complete the circuit by connecting both ends using another wire. It means you need to place a piece of wire in place of the thermal fuse by soldering.
Then, provide an electricity supply to the appliance. If it works, that means the thermal fuse is faulty. If it doesn't work after replacing a wire with the fuse, there are issues with the appliance.
As there will be no device to control the heating element, you must not use it for more than testing purposes.
One more way is to use a jumper wire. If you have a jumper wire, you can use to link both the ends of the thermal fuse and check if the circuit is complete. If the circuit is complete, it means the fuse is bad.
What to Do if Your Dryer Stops Working?
It may appear complex. There could be multiple suspects causing trouble to the dryer. However, in most cases, dryers stop functioning when thermal fuses heat up and become unusable.

What could be possible reasons for the thermal fuse's blackout?
Naturally, thermal fuses wear out when you use them for the long-term. Moreover, if you keep the dryer ON for an extended period, it may trigger the thermal fuse. It can be because of a heating element of the dryer.
1) When the thermostat continuously covers several cycles, it may malfunction.
2) The improper shape and structure of blower motor fan blades can cause heating issues.
3) No proper cooling for the internal units due to limited air flow.
You must use dryers in a proper way. It is necessary to keep a check on dryers and service their interior components regularly to ensure proper functioning.
Considering the current case, you need to check and replace the thermal fuse when it stops working. If it is working well, you may need to give your dryer for troubleshooting and repair. Follow these steps to know how you can test the dryer fuse.
Unplug the Dryer and Detecting the Thermal Fuse
The first step is to take the safety measure by unplugging the dryer from the wall outlet. After you unplug the dryer, the power supply will stop. After that, you can move forward to unbolt the dryer. For your ease, you can take the help of your hair dryer's manual. If the manual is not available, you can search the details online to find out about the dryer's structure. It will let you know the exact position of the thermal fuse in the unit.
Generally, you can search for the thermal fuse on the bottom kick panel or access panel. You can use a flathead screwdriver to open it. If you do not find it there, there are high chances that it's present on the rear panel. You can remove the rear panel also, by pulling out the screws holding the panel.
In some models, the thermal fuse is attached to the exhaust duct using screws. You need to use the screwdriver to detach it from the exhaust duct and take it out.
Bypassing the Dryer Thermal Fuse
When a multimeter is present, you can check if the fuse is blown. However, when it is absent, you can use the bypass method.
That's easier than said. However, using a dryer without the fuse for a long period is dangerous. If the dryer heats up, there is no element to control the heating element. It can damage the appliance and even harm the person around it. Therefore, make sure you only bypass the dryer thermal fuse for testing purposes.
After you locate the thermal fuse in place, you need to use electrical tape to tape both ends. If the dryer is working fine after bypassing the thermal fuse, you need to change it instantly.
People do bypassing when they need to dry their clothes and they don't have time to buy a new fuse. However, the dryer without a fuse could be hazardous.
For safety purposes, the law has made it compulsory to place a fuse in the dryer panel.
Undoing the Fuse Bypassing
As said before, thermal fuse bypassing is only required in the absence of continuity testers. Therefore, make sure to remove the electrical tape after the test. If the dryer worked well after bypassing, just replace the thermal fuse. Please note that the design of the fuse should be according to the dryer make. However, when the fuse is perfect, take the dryer to the service center. Let a technician repair it who has experience with the model and repairing such things.
How to Make the Thermal Fuse Testing Easier?

Buy the Dryer having Fuse Status Indicator
There are dryers and ovens which come with thermal fuse status indicators. Whenever you provide electricity supply, the indicator indicates that electricity is passing through it, and the fuse is working well.
However, if there is a problem with the fuse and the appliance is not working, the indicator will not turn ON. On the other hand, when it is working fine, the light glows even if the product is not functioning. It suggests that the problem will not be solved if you replace the fuse. You need to deliver your device for repair.
Check out for Dryer with Spare Fuse
You must buy a product having a spare thermal fuse. You will only need to replace the current one with the spare one to test it. If the device starts working after the replacement, it indicates wearing out of the fuse. However, even after changing the fuse, if the instrument doesn't function, that means your machine has other issues.
Conclusion
There are several options for how to test a thermal fuse without a multimeter. You can use the ohmmeter to check the resistance; you can bypass the fuse, replace the fuse & check, etc.

Knowing this skill will save you from unnecessary expense on the simple requirement of testing and changing the fuse. Besides that, you can start using electrical gadgets without much wait. You won't need to depend upon a technician.
If you have any such issues, try out different ways and let us know which worked the best for you. Also, if you have a question, please mention it in the comments section.
hinkleforgerbours.blogspot.com
Source: https://www.toolzpoint.com/how-to-test-a-thermal-fuse-without-a-multimeter/
0 Response to "How to Check Continuity on a Thermal Fuse"
Post a Comment